Instead of manually creating OG images or using template-based tools, Satori makes it easy to generate images with React components.
Here’s how to implement it:
- Generate SVG with React components using Satori
- Convert SVG to PNG with Sharp
- Serve unique OG images for each post using Astro’s dynamic routes
🚨
Since generating SVG and converting to PNG is computationally expensive, make sure this runs at build time (SSG), not in cloud runtime (SSR) environments.
1. Generate SVG with Satori
Satori is a library maintained by Vercel that converts HTML and CSS to SVG. It supports JSX syntax, making it easy to generate SVG data with React components.
bun add -D satoribashimport satori, { type SatoriOptions } from 'satori';
const satoriOption: SatoriOptions = {
width: 1200,
height: 630,
};
export async function generateOgImage({
title,
desc,
}: {
title: string;
desc?: string;
}) {
const svg = await satori(
<div
style={{
boxSizing: 'border-box',
display: 'flex',
flexDirection: 'column',
justifyContent: 'center',
gap: '16px',
height: '100%',
width: '100%',
padding: '80px',
color: '#000',
backgroundColor: '#fff',
}}
>
<div style={{ fontSize: '64px', fontWeight: 700 }}>{title}</div>
{desc && (
<div style={{ marginTop: '20px', fontSize: '32px', color: '#464646' }}>
{desc}
</div>
)}
</div>,
satoriOption,
);
}tsx2. Convert SVG to PNG with Sharp
Sharp is a Node.js library for image processing.
Note that it doesn’t work in browser environments.
bun add -D sharpbashConvert the generated SVG string to a Buffer for image processing:
export async function generateOgImage() {
  const svg = '...';

  const image = sharp(Buffer.from(svg)).png({
    compressionLevel: 9, // Maximum compression level (0-9)
    adaptiveFiltering: true, // Optimize file size with adaptive filtering
    palette: true, // Convert to palette-based PNG (effective for fewer colors)
    quality: 80, // Image quality (0-100)
  });

  return await image.toBuffer();
}tsx
3. Serve OG Images in Astro
Now let’s set up routes in Astro to serve these images.
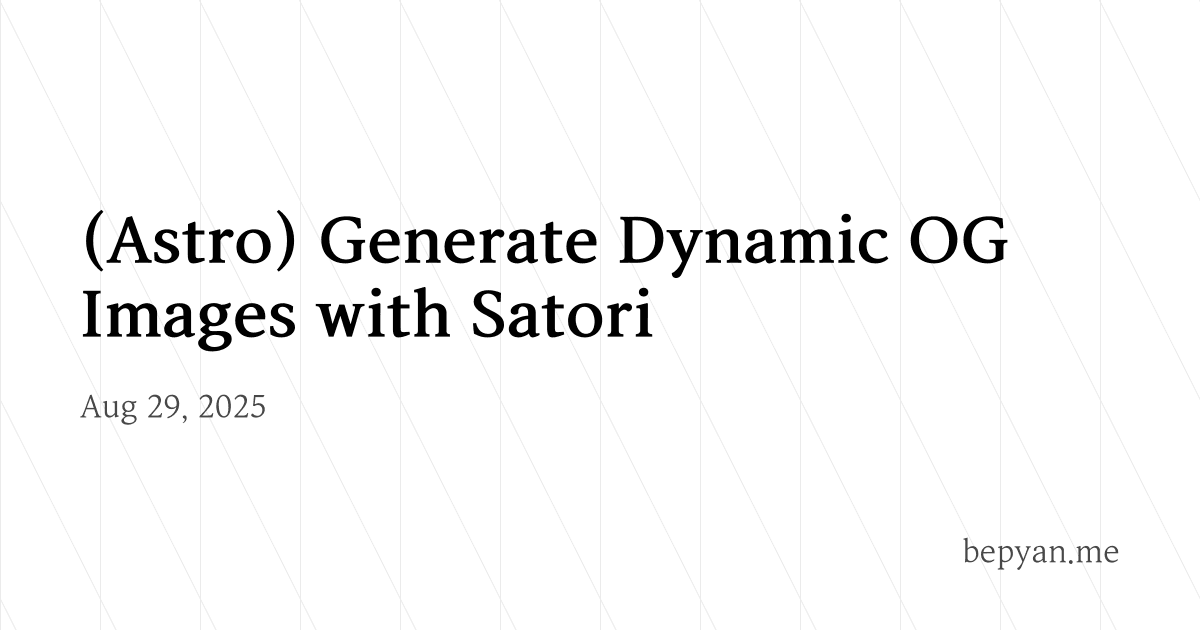
I set the path as pages/og/[...slug].png.ts.
The OG image for this post is accessible at /og/post/astro-dynamic-og.png.
import type { APIContext } from 'astro';
import { getCollection } from 'astro:content';
import { format } from 'date-fns';

import { generateOgImage } from '~/libs/og-image';

const posts = await getCollection('post');

export function getStaticPaths() {
  return posts.map((post) => ({
    params: { slug: post.slug },
  }));
}

export async function GET(ctx: APIContext) {
  const post = posts.find((post) => post.slug === ctx.params.slug);
  if (!post) return ctx.rewrite('/404');

  const ogImage = await generateOgImage({
    title: post.data.title,
    desc: format(post.data.date, 'MMM dd, yyyy'),
  });

  return new Response(ogImage, {
    status: 200,
    headers: {
      'Content-Type': 'image/png',
    },
  });
}ts
Astro allows you to specify the image format in the Response header.
Now you can link to the OG image from your blog pages:
import { getCollection } from 'astro:content';

export async function getStaticPaths() {
  const posts = await getCollection('post');

  return posts.map((post) => {
    return {
      params: { slug: post.slug },
      props: {
        title: post.data.title,
        description: post.data.description,
        image: `/og/${post.slug}.png`,
        // ...
      },
    };
  });
}ts
🍯 Pro Tips
The devil is in the details.
Here are practical tips to enhance your OG image quality.
Using Custom Fonts
Fetch font data and inject it into satoriOption to use it with CSS fontFamily:
import satori, { type SatoriOptions } from 'satori';

async function getFontData(url: string) {
  const fontResponse = await fetch(url);
  return await fontResponse.arrayBuffer();
}

const [AritaBuri, AritaBuriBold] = await Promise.all([
  getFontData(
    'https://cdn.jsdelivr.net/gh/taevel02/typeface-arita/Arita-buriM.woff',
  ),
  getFontData(
    'https://cdn.jsdelivr.net/gh/taevel02/typeface-arita/Arita-buriB.woff',
  ),
]);

const satoriOption: SatoriOptions = {
  // ...
  fonts: [
    {
      name: 'Arita Buri',
      data: AritaBuri,
      weight: 400,
      style: 'normal',
    },
    {
      name: 'Arita Buri',
      data: AritaBuriBold,
      weight: 700,
      style: 'normal',
    },
  ],
};

export async function generateOgImage() {
  const svg = await satori(
    <div
      style={{
        fontFamily: 'Arita Buri',
        // ...
      }}
    >
      {/* ... */}
    </div>,
    satoriOption,
  );
}tsx
Adding Background Patterns
Add background patterns to make your images less bland:
await satori(
  <div
    style={{
      // ...,
      backgroundColor: '#fff',
      backgroundImage: `url("data:image/svg+xml,%3Csvg xmlns='http://www.w3.org/2000/svg' width='100' height='199' viewBox='0 0 100 199'%3E%3Cg fill='%23000000' fill-opacity='0.08'%3E%3Cpath d='M0 199V0h1v1.99L100 199h-1.12L1 4.22V199H0zM100 2h-.12l-1-2H100v2z'%3E%3C/path%3E%3C/g%3E%3C/svg%3E")`,
    }}
  >
    {/* ... */}
  </div>,
);tsx
Check out https://heropatterns.com/ for great patterns.
Adjust the pattern color and opacity to apply it to your CSS styles.
In Conclusion
We’ve explored how to generate dynamic OG images in Astro using Satori and Sharp.
Dynamic OG image generation goes beyond automation—it’s a powerful way to maintain consistent brand identity while effectively conveying unique information for each piece of content. It’s particularly useful for projects like blogs or documentation sites where content is continuously added.